International Journal of Pharmaceutical and Phytopharmacological Research
ISSN (Print): 2250-1029
ISSN (Online): 2249-6084
|
Adaptation of Custom Trays Fabricated Using CAD/3D Printer and Manual Techniques Katayoun Sadr1, Shima Ghasemi1, Alireza Hayati Garjan2* |
|
1 Assistant Professor, Department of Prosthodontics, Faculty of Dentistry, Tabriz University of Medical Sciences, Tabriz, Iran. 2 Postgraduate Student, Department of Prosthodontics, Faculty of Dentistry, Tabriz University of Medical Sciences, Tabriz, Iran. |
ABSTRACT
Background: The aim was to investigate the utilization of CAD/ 3D printers for designing and manufacturing custom trays, which is one of the steps in the fabrication of complete dentures. Materials and methods: The samples included 36 trays on maxillary casts of edentulous mannequins that were divided into 6 groups (n=6) as the following: Group 1: the trays with selective pressure produced using CAD/3D printer, Group 2: the trays with selective pressure fabricated using cold-cured acrylic resin, Group 3: the trays with selective pressure fabricated using light-cured resin, Group 4: the trays with space using CAD / 3D printer, Group 5: the trays with space fabricated using cold-cured resin, and Group 6: the trays with space fabricated using light-cured resin. The distance between the tissue surfaces of the trays was calculated using MATLAB software. One-way ANOVA test was used for statistical analysis, and P<0.05 was considered as significant. Results: There is a significant difference between groups 1, 2 and 3 (P=0.001). Pairwise comparisons with post hoc Tukey tests showed that the mean distance in group 2 was significantly higher than those in groups 1 and 3 (P=0.001); however, the mean distances between groups 1 and 3 were not significant. There were no significant differences between groups 4, 5 and 6 (p = 0.53). However, the mean distance in the trays fabricated by the 3D printer was lower than that in the trays fabricated using cold-cured and light-cured acrylic resins. Conclusion: Adaptation and space distribution in the trays fabricated by the 3D printer was more suitable than the conventional trays.
Key Words: Edentulous maxillary custom tray, 3-dimensional printing technique, digital fabrication of a custom tray
INTRODUCTION
In recent years, improvements in public health standards and increases in life expectancy have led to an increase in the elderly population in many countries of the world. As a result, it can be expected that the need for prosthetic treatments, especially complete dentures, will increase in this growing population in the future. Therefore, the use of modern methods and improving the stages of fabrication of complete dentures should be considered seriously [1–3].
After the introduction of acrylic resins in dentistry in 1936, the method of fabrication of complete dentures has not been improved over the 70 years. Therefore, the procedure of fabrication of dentures is challenging for the dentists, patients, and technicians.
The conventional complete denture treatment is a complicated and difficult process that requires experts and experienced technicians. The patients (especially elderly patients suffering from systemic diseases) have complained about the number of appointments and the time required to manufacture dentures. On the other hand, acrylic resins have all the properties of an ideal material for denture bases [4].
One of the most important developments in the treatment and fabrication process of dental prostheses over the past two decades is the use of digital technology so that a number of usual stages of fabrication of prostheses can be replaced by computer-aided design and computer aided manufacturing (CAD/CAM and 3D Rapid Prototyping). The use of these methods has made it possible to simplify and solve a number of complications in denture fabrication processes. A systematic review of articles was conducted from 1984 to 2019 [4-10] and concluded that the use of digital technology simplifies the fabrication process of dentures and decreases the number and duration of clinical visits.
The satisfaction of patients with digitally produced dentures is higher than the conventional dentures, and it will be possible to develop a digital archive to record data on the fabricated dentures [11]. Kattadiyil et al. conducted a clinical study on 10 patients in Lornia Linda University Prosthetics Department. They fabricated dentures using the conventional methods and CAD/CAM technique and compared them. The results showed that the patients were more satisfied with digital dentures and preferred them. In addition, the patients were more satisfied with the retention of maxillary digital dentures compared to the mandibular dentures, and overall, they were more satisfied with digital dentures compared to the conventional ones. The students significantly preferred the digitally designed dentures and believed that the time required to fabricate a denture using the conventional method is significantly more than that with the use of the new technique [12].
The first step in fabricating dentures is to pour casts of the edentulous upper and lower jaws and make a model on which the denture will be constructed. Support, retention, stability and, in other words, the success of dentures depend on the precision of the produced impressions and casts [1]. A number of methods are implemented to produce casts, including conventional one-step method, as well as two-step correction of the impression. In the two-stage impression taking, the initial impression is produced using a pre-fabricated tray, which is rarely appropriate for the ridge of patients because the degeneration of the ridge is different in patients, does not follow a particular pattern and depends on a variety of factors. Therefore, the use of pre-fabricated trays is not sufficient for the proper expansion of margins and uniform thickness of the impression material. As a result, this step is implemented using a special tray. In addition, the use of a special tray allows the dentist to choose the impression-taking method (static or with selective pressure), as well as the material type [1, 13].
Use of a proper tray is an important factor for a successful impression taking [1]. A common problem in the fabrication of special trays is its deformation due to polymerization shrinkage of acrylic resins, which produces a space on the tissue surface of the cast, especially at the margins and the PPS area [14]. This prevents correct impression taking and border molding, leading to reduced retention of the denture.
Chen et al. compared the custom and digital methods of fabricating special trays of the lower jaw, reporting that although the difference between the two methods was not statistically significant, the digital tray exhibited a higher precision compared to the manual method [15].
Considering the advances in digital technology, there is no doubt that the most common stages of dentures fabrication will be computer-assisted in the near future. In contrast to the fabrication stages of fixed prostheses (from impression taking to the fabrication of restorations), which can be implemented digitally, with a number of studies, having reported the fabrication process, esthetic, accuracy and clinical outcomes of it, complete prosthetic treatments have been evaluated in only a few studies [8]. Therefore, in the present study, the adaptation between the tissue surfaces of the special tray and the edentulous maxillary casts were compared using custom and digital techniques by CAD and a 3D printer so that it would be possible to investigate the feasibility of using digitally fabricated special trays in the conventional method of denture fabrication. In addition, regarding the type of impression taking and depending on the clinical condition, the trays which were fabricated using both digital and custom techniques, were designed for impression taking with selective pressure and mucostatic impression taking procedures.
MATERIALS AND METHODS
A standard mannequin of edentulous maxilla was produced using a pre-fabricated tray and alginate (Tropicalgin, Zhermack, Germany) impression material. Then, a cast was created using Type III stone. In the next step, the samples were divided into 6 groups (n=6) (Table 1).
Table 1: Grouping of the samples
|
G1: The special tray with selective pressure, fabricated using CAD and 3D printer techniques |
|
G2: The custom tray with selective pressure, fabricated from cold-cured acrylic resin, using the conventional technique |
|
G3: The custom tray with selective pressure, fabricated from light-cured acrylic resin, using the conventional technique |
|
G4: The special digital tray with space, fabricated using CAD and 3D printer techniques |
|
G5: The special digital tray with space, fabricated using cold-cured acrylic resin, using the conventional technique |
|
G6: The special digital tray with space, fabricated using light-cured acrylic resin, using the conventional technique |
Group 1 included the special digital trays with the selective pressure, fabricated using CAD and 3D printer techniques, Group 2 included the custom trays with selective pressure, fabricated from cold-cured acrylic resin, Group 3 consisted of the custom trays with selective pressure, fabricated from light-cured acrylic resin, Group 4 included the special digital trays with space, fabricated using CAD and 3D techniques, Group 5 consisted of the custom trays with space, fabricated from cold-cured acrylic resin, and group 6 included the custom trays with space, fabricated from light-cured acrylic resin.
Preparation of the samples
Group 1: First, the tissue surfaces of the casts were scanned using a 3D scanner (3D Maestro, AGE Solutions S. R., Italy) with 20-μm precision and the relevant data were stored as an SLT (stereolithography) file format. Data were transferred to a tray (3Shape, 3Shape, Denmark) and the design was implemented using CAD system (Exocad Gmbh, Germany) so that a 1.5-mm space was created between the tissue surface of the special tray and the areas of the maxilla that should be relieved (with secondary pressure regions and the midpalatal raphe) (offset). In addition, the margins of the designed tray were 2 mm shorter than the depth of the sulcus (Figure 1) [1]. The data of the designed special trays using CAD were transferred to a computer connected to a 3D printer (fused deposition modeling [EDM], 3D printer DLP, Bonyan Mechatronic, Iran). Then, the special tray was printed using 50-micron layers made of light-cured acrylic resin (UV Cure). The handle of the tray was designed separately and added to the body (Next Dent Model Resin, 3D System INC, Netherlands) (Figure 2a).
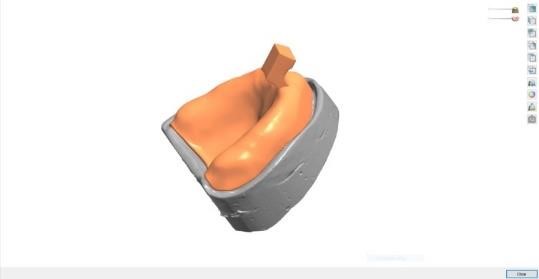
Figure 1: Designing of the cast and tray using Shape-3 software.
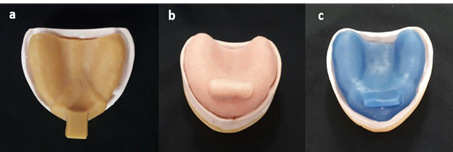
Figure 2: Trays produced using a: 3D printer, b: conventional using cold-cured acrylic resin, c: conventional using light-cured acrylic resin.
Group 2: First, the regions of the maxillary cast, including secondary pressure areas and midpalatal raphe, were relieved using pink Cavex Modeling Wax (Netherlands) with a width of 1.5 mm [1, 13]. Cold-cured powder and liquid of acrylic resin (SR Triplex Cold Ivoclar, Vivadent AG, Liechtenstein) were mixed according to the instructions of the manufacturer. During the doughy stage, a width of 3–4 mm of the acrylic resin was placed on the pre-greased (using petroleum jelly) cast and adapted using finger pressure. The margin of the tray was shortened up to a 2-mm depth of the sulcus and polished with a handpiece, an acrylic resin bur, and polishing paper. It should be noted that all the conventional trays were fabricated by a single technician and all the measurements were made at least 24 hours after the fabrication of the tray (Figure 2-b).
Group 3: First, the regions of the maxillary cast, including secondary pressure areas and midpalatal raphe, were relieved using pink Cavex Modeling Wax (Netherlands) with a width of 1.5 mm. Then, a layer of light-cured resin (Plaque Photo R, WP Dental, Germany) was placed on the cast. The excess acrylic resin was removed up to 2 mm of the margins and light-cured for 10 minutes (Figure 2-c).
Group 4: A space of 1.5 mm was defined between the tissue surface of the cast and special tray in this group except for the PPS area. Four tissue stops with a dimension of 2×2 mm (two in the anterior and two in the posterior areas) were used. The remaining steps of the fabrication process of the special tray were implemented similar to that in Group 1.
Group 5: A layer of pink wax (Cavex, Modeling Wax, Netherlands) with a width of 1.5 mm was placed on the cast except for the PPS area, and then, the special tray was constructed using the conventional method similar to that in Group 2. In addition, four tissue stops with a dimension of 2×2 mm were used in the anterior and posterior areas.
Group 6: A layer of pink wax (Cavex, Modeling Wax, Netherlands) with a width of 1.5 mm was placed on the cast except for the PPS area, and then, the special tray was constructed using the custom method similar to that in Group 3. In addition, three tissue stops with a dimension of 2×2 mm were used in the anterior and posterior areas.
Investigation of adjustment between the printed special tray and the cast
Initially, the special tray was printed and the cast was scanned. Then, the complex was sectioned using MATLAB software (MATLAB, MathWorks, USA) at 0.2-mm intervals to measure the distance between the tissue surface of the cast and the tray in 10,000 points.
Investigation of adjustment between the custom special tray and the cast
First, the cast–wax–tray complex was scanned; then the cast and tray were scanned individually. The data on the cast and tray were implemented on the cast–wax–tray complex. Then, the distance between the tissue surface of the cast and tray was recorded using MATLAB software (MATLAB, MathWorks, USA) (Figure 3).
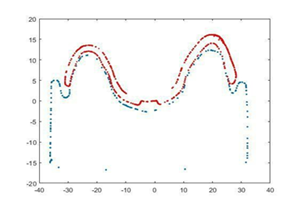
Figure 3: Measurement of the space between the tissue surface of the special tray (lower red line) and tissue surface of the cast (blue line) using MATLAB software
Statistical analysis included descriptive statistics (mean ± SD) and one-way ANOVA to evaluate the difference between the study groups, followed by post hoc Tukey tests. Statistical analyses were performed with SPSS 18, considering P<0.05 as the significance level.
RESULTS
The means and standard deviations of the distances between the tissue surfaces of the casts and special trays prepared for impression taking with selective pressure, using the three-dimensional printer and custom methods (cold-cured and light-cured acrylic resins), as well as the results of one-way ANOVA, are presented in Table 2.
The results indicated that the mean distance between the tissue surface of the cast and the special tray fabricated using 3D printer technique (mean = 0.75±0.04) was lower than the conventional cold-cured acrylic resin tray (mean = 1.23±0.28) and light-cured acrylic resin tray (mean = 0.89±0.08).
The results of one-way ANOVA showed significant differences in the distance of the tray and the tissue surface of the cast between the three groups (P=0.001). Two-by-two comparisons using post hoc Tukey tests showed that the mean distance between the tissue surface of the cast and group 2 trays were significantly more than that in groups 1 and 3 (P=0.001); however, the mean distances between groups 1 and 3 were not significantly different.
Table 2. Dispersion indicators of the distances between the tissue surfaces of the casts and special trays fabricated with selective pressure using the 3D printer and the conventional method with cold-cured and light-cured acrylic resins
|
Group |
Frequency |
Mean |
SD |
95% confidence interval |
P-value |
|
|
Lower bound |
Upper bound |
|||||
|
Group: 3D printer |
6 |
0.75 |
0.04 |
0.71 |
0.8 |
0.001 |
|
Group 2: Conventional method with cold-cured acrylic resin |
6 |
1.23 |
0.28 |
0.93 |
1.52 |
|
|
Conventional method group with light-cured acrylic resin |
6 |
0.89 |
0.08 |
0.81 |
0.97 |
|
One-way ANOVA: P-value
* The significance of the Tukey test
Table 3 shows the means and standard deviations of the distances between the tissue surfaces of the casts and special trays fabricated using the 3D printer and conventional techniques (cold-cured and light-cured acrylic resins). The Table also shows the results of one-way ANOVA.
The results showed that the mean distance between the tissue surface of the cast and special tray fabricated using the 3D printer (mean = 1.71±0.11) was less than that with the conventional technique with cold-cured (mean = 1.82±0.22) and light-cured acrylic resins (mean = 1.78±0.16). However, the results of one-way ANOVA did not show any significant differences in the mean distances between groups 4, 5 and 6 (P=0.53).
Table 3. Dispersion indicators of the distances between tissue surfaces and special trays fabricated using the 3D printer and the conventional techniques with cold-cured and light-cured acrylic resins
|
Group |
Frequency |
Mean |
SD |
95% confidence interval |
P-value |
|
|
Lower bound |
Upper bound |
|||||
|
Group 4: 3D printer |
6 |
1.71 |
0.11 |
1.59 |
1.82 |
0.534 |
|
Group 5: Conventional method with cold-cured acrylic resin |
6 |
1.82 |
0.22 |
1.58 |
2.05 |
|
|
Group 6: Conventional method with light-cured acrylic resin |
6 |
1.78 |
0.16 |
1.61 |
1.96 |
|
One-way ANOVA: P-value
The analysis of the space between the tissue surface of space-less trays in groups 1, 2 and 3 (MATLAB software) is shown in Figure 3. The maximum distance in all the three groups was seen at the margins and the midpalatal area. Figure 4 shows the spaces between the trays and casts in groups 5, 6 and 7. In addition, the maximum distance was seen in the margins and in the midpalatal area.
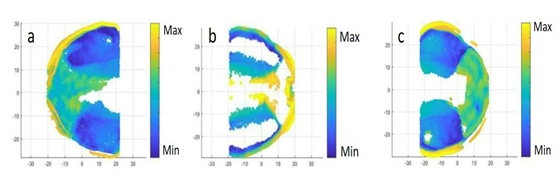
Figure 4: Analysis of the spaces between the tissue surface of the space-less trays in a: 3D printer, b: conventional method with cold-cured acrylic resin, and c: conventional method with light-cured acrylic resin
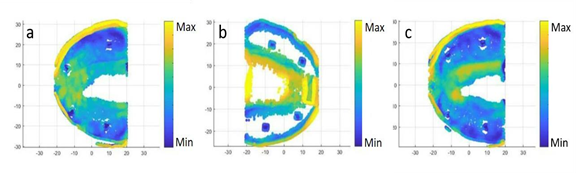
Figure 5: Analysis of the space between the tissue surfaces of the spaced trays in a: 3D printer, b: conventional method with cold-cured acrylic resin, and c: conventional method with light-cured acrylic resin
DISCUSSION
Significant developments have been made in the fabrication of complete dentures using digital technology in recent years. The results indicate that CAD/CAM and 3D printer enable the dentist to maintain better control over the treatment outcomes in the denture fabrication process. In addition, they improve the communication between the patient, dentist, and laboratory, making the laboratory practice easier and reducing chair time. They also eliminate the bias resulting from polymerization shrinkage in the denture base and improve the precision, adjustment, and retention of the denture. Furthermore, they facilitate the duplication of dentures, which generally improves the quality of the treatment [4, 8].
In the present study, the adjustment of the special tray, fabricated by the digital method (using CAD and a 3D printer) and analog method (conventional), was investigated. The results from space-less trays indicated a minimum distance between the tissue surfaces of the trays and casts in the trays fabricated using CAD and 3D printer techniques. In addition, the maximum space was seen in the custom trays fabricated with cold-cured acrylic resin, which was significantly different from the other groups. The analysis of the distance between the surfaces of the tray and cast in the groups of space-less trays using MATLAB software indicated the uniformity of the space in different parts of the digital trays compared to the conventional trays.
Sun et al. [16] examined the thickness of the impressions taken with digital and conventional trays. They concluded that trays fabricated with the use of 3D printers provided a more homogeneous space for the impression material compared to the conventional trays. However, the uniform thickness of the impression material played an important role in the precision of the molds and casts produced from it [17].
The mean distance in a custom tray fabricated with the use of light-cured acrylic was significantly lower than that fabricated with cold-cured acrylic resin. In addition, the space between the tray and the cast was also uniform, which might be attributed to the convenience of work and unrestricted working time, allowing the operator to better adapt the acrylic resin with the casts during the fabrication of the tray [18]. As shown in Figure 4, in both the digital and conventional tray groups, the maximum distance was seen in the margins and midpalatal area, which is consistent with the results reported by Sun et al. [16].
The results of this study also indicated that the differences in the mean distances between the tray and the cast in spaced tray groups fabricated using CAD, 3D printer and conventional techniques using cold-cured and light-cured acrylic resins were not significant.
Chen et al. [15] reported no significant difference in the distance of tissue surface of the tray and cast in the spaced trays fabricated using CAD and 3D printer techniques, and conventional method using light-cured acrylic resins for edentulous mandibles. Sun et al. [16] showed no statistically significant differences between the spaced trays fabricated using 3D printers and conventional trays, which might be due to the homogeneous space produced by tissue stops between the tray and cast [19, 20]. However, according to Figure 5, the space between the tray and cast in the trays fabricated using a 3D printer and light-cured acrylic resin was more homogeneous compared to the cold-cured acrylic resin trays.
The results of the present study indicated that the special trays fabricated using 3D printers had better precision and adaptation compared to the custom trays, in addition to providing a uniform three-dimensional space for the impression material. Therefore, they can be used in fabricating dentures similar to conventional trays. In addition, considering the homogenous distribution of space between the tray and cast, they are expected to prepare accurate impressions and casts.
CONCLUSION
Adaptation and distribution of space in the trays fabricated using 3D printers were better than the conventional trays and they can be used in taking the final impression from edentulous maxilla in the fabrication of dentures.
ACKNOWLEDGMENT
REFERENCES